Add and remove/delete/ignore printers
When a printer is deleted via the Admin web interface, PaperCut MF retains the associated data for reporting.
On Windows
PaperCut NG/MF tracks all print queues local to the system by default. Local print queues are those that have been set up on the server running PaperCut NG/MF with a local port, such as: a TCP/IP connection to a network printer, an LPRThe Line Printer Remote protocol (LPR) is a network protocol for submitting print jobs to a remote printer. A server for the LPD/LPR protocol listens for requests on TCP port 515. A request begins with a byte containing the request code, followed by the arguments to the request, and is terminated by an ASCII LF character.
An LPD printer is identified by the IP address of the server machine and the queue name on that machine. Many different queue names may exist in one LPD server, with each queue having unique settings.
The LPR software is installed on the client device. connection, or a printer attached locally via USB or LPT. Standard Windows print queues that are hosted on a different system, or re-shared
, are not tracked (you can track these queues by setting up a secondary print serverA print server is a system responsible for hosting print queues and sharing printer resources to desktops. Users submit print jobs to a print server rather then directly to the printer itself. A print server can be a dedicated server but on many networks this server also performs other tasks, such as file serving, see Configuring secondary print servers and locally attached printers).
New print queues added to the system should show up automatically in PaperCut NG/MF, however, in some rare situations the printer shows up only after the first print job is sent.
Under some situations you might not want to track all printers. Some examples of why an administrator might not want to monitor a printer include:
-
The printer is a
virtual printerA virtual printer is a printer driver that resembles the functionalities of a physical printer, but is not actually associated with one. Instead, a virtual printer sends its output to a file, normally in PDF format or in other image formats like JPEG, TIFF or PostScript. A virtual printer acts similarly to a physical printer in that it transforms an electronic document into a form that can be easily read by the target user or device. In PaperCut, virtual printers are used for Find-Me printing.
such as a PDF generator, FAX, or document management program. -
The administrator might want to offer free printing on a selected printer and is not concerned with monitoring (silent monitoringIn silent monitoring mode, all users have unrestricted privilege so printing access is never denied. Papercut silently collects statistics on activity and its associated cost. All data is reportable and available in the Admin interface. Silent monitoring mode is popular in a business environment where management needs information on user activity. with a zero page cost also achieves this).
-
The printer might not be supported by PaperCut NG/MF and needs to be ignored.
The Print ProviderA Print Provider is a monitoring service installed on a secondary print server to allow PaperCut to control and track printers. This monitoring component intercepts the local printing and reports the use back to the primary Application Server. component is responsible for locating and tracking the printers. To instruct it to ignore a printer:
-
On the computer system hosting the queue to be added/removed/ignored, open the file [app_dir]\providers\print\win\print-provider.conf in a text editor such as Notepad.
-
Locate the line IgnorePrinters= and enter the full name of the printer on the right-hand-side of the equals line. For example:
IgnorePrinters=Office Printer
NOTEThis is the printer's locally assigned name and not the name of its network share.
If you have multiple printers to ignore, then separate the each printer name with a comma. For example:
IgnorePrinters=Office Printer,Copy Room Printer
Wildcard expressions can also be used. Use '*' to ignore any span of characters, and '?' to ignore a single character. For example, to ignore any printers that start with the phrase Copy Room:
IgnorePrinters=Copy Room*
-
Restart (stop then start) the PaperCut Print Provider component under Start > Control Panel > Administrative Tools > Services
-
In the Admin interface, delete the printer from PaperCut NG/MF:
-
Click Printers; then click the name of the device you want to delete.
-
In the Actions menu, click Delete this device.
-
Click OK.
-
-
Test the changes by printing to the deleted printer and ensuring the printer does not re-register itself in the system. It if does, verify the name assigned under the IgnorePrinters= setting is correct.
On Mac
When you first install PaperCut NG/MF, all printers are automatically added. If you add any printers to your print server after installation, they are also automatically added to PaperCut NG/MF. The monitored printers are listed on the Printer List page. If the printers are not displayed, try printing a document. The first job triggers registration.
You can, however, change the configuration so that new printers are not automatically added. You might want to do this if you do not want all printers monitored. If that is the case, you need to manually add the required printer. For more details, see To manually add a printer.
To manually add a printer
You cannot use the automatic addition of printers functionality if one or more printers in your network are not tracked.
-
Ensure the Print Setup Utility is closed.
-
Stop new printers from being automatically added to PaperCut NG/MF:
-
On the computer system hosting the queue to be added/removed/ignored, In a text editor such as Notepad, open the file:
[app_dir]\providers\print\mac\print-provider.conf . -
Locate the line EnablePrinterAutoImport=on.
-
Change on to off.
-
Save the file.
-
The service is called papercut-event-monitor on both Mac and Linux machines. For more information, see How to Enable Debug in the Print Provider.
-
-
On the print server, open a terminal.
-
Navigate to:
cd [app_directory]/providers/print/mac-*
-
Type the following command:
sudo ./configure-cups --list
A list of all printers connected to the server is displayed.
-
To add a printer, type the following command:
sudo ./configure-cups --add <printer name>
The printer is now added to the server.
-
Type the following commands:
cd ~/providers/print/mac
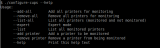
sudo ./configure-cups --help
The options available in this tool are displayed.
-
Test the changes by printing to the printer.
PaperCut NG/MF also has an interactive script that allows you to enable or disable monitoring of each individual printer. This tool has the advantage of being easy to use, however, you need to re-enable or re-disable every printer each time you make a change to a single printer.
-
Double-click the Control Printer Monitoring.command script.
/Applications/PaperCut NG/MF/Control Printer Monitoring.command.
Each printer on your server is displayed one at a time.
-
For each printer, select to either enable or disable monitoring:
-
to enable monitoring of a printer, type e
-
to disable monitoring of a printer, type d
-
At the technical level, macOS systems use the Common UNIX Printing System (CUPSCommon User Printing System (CUPS) is a printing system for Unix operating systems that allows a computer to act as a print server. A computer running CUPS is a host that can accept print jobs from client computers, process them, and send them to the appropriate printer.). PaperCut NG/MF tracks printing by integrating with CUPS. (For SysAdmins familiar with CUPS, PaperCut NG/MF integrates by wrapping or proxying the CUPS backend). The Control Printer Monitoring.command script and the configure-cups command edit the file /etc/cups/printers.conf and prefixes the DeviceURI with papercut:, enabling monitoring on the selected printer. SysAdmins experienced with the terminal might prefer to edit the printers.conf file directly with a text editor. See On Linux for more details.
Delete a printer
You might want to delete a printer for the following reasons:
-
the printer is decommissioned
-
you no longer want to track the printer
To remove a decommissioned printer
-
Remove the print queueA print queue displays information about documents that are waiting to be printed, such as the printing status, document owner, and number of pages to print. You can use the print queue to view, pause, resume, restart, and cancel print jobs. off your print server
-
In the PaperCut NG/MF Admin interface:
-
Click the Printers tab.
The Printer List page is displayed.
-
Select a printer.
The Printer Details page is displayed showing the Summary tab contents.
-
In the Actions menu, click Delete this printer.
-
To stop monitoring a printer
You cannot use the automatic addition of printers functionality if one or more printers in your network are not tracked.
-
Stop new printers from being automatically added to PaperCut NG/MF:
-
On the computer system hosting the queue to be added/removed/ignored, In a text editor such as Notepad, open the file:
[app_dir]\providers\print\mac\print-provider.conf . -
Locate the line EnablePrinterAutoImport=on.
-
Change on to off.
-
Save the file.
-
Restart the secondary server.
The service is called papercut-event-monitor on both Mac and Linux machines. For more information, see How to Enable Debug in the Print Provider.
-
-
On the print server, open a terminal.
-
Navigate to:
cd [app_directory]/providers/print/mac-*
-
Type the following command:
sudo ./configure-cups --list
A list of all printers connected to the server is displayed.
-
To delete a printer, type the following command:
sudo ./configure-cups --remove <printer name>
The printer is now removed from the server.
-
In the Admin interface, delete the printer from PaperCut NG/MF:
-
Click the Printers tab.
The Printer List page is displayed.
-
Select a printer.
The Printer Details page is displayed showing the Summary tab contents.
-
In the Actions menu, click Delete this printer.
-
-
Test the changes by printing to the deleted printer and ensuring the printer does not re-register itself in the system. It if does, verify that it is not being monitored using configure-cups.
On Linux
PaperCut NG/MF tracks printing by integrating with the Common UNIX Printing System (CUPS), the printing system on Linux. For a printer to be tracked, CUPS needs to be told to route print jobs through PaperCut NG/MF before printing.
To do this, the printers.conf file must be edited. This can either be done manually, or assisted via the configure-cups script.
Set up printers using a script
-
On the print server, open a terminal.
-
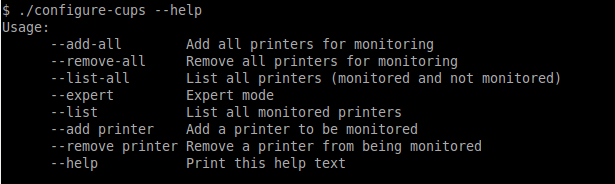
Type the following commands:
cd ~/providers/print/linux-*
sudo ./configure-cups --help
The options available in this tool are displayed.
-
To monitor all printers on your network, type:
--add-all
-
To monitor a subset of printers in your network:
-
Type --list-all
A list of all printers on your network is displayed.
-
For each printer you want to add, type --add <printer name>
-
To use the script, run the script file at [app-path]/providers/print/linux-*/configure-cups. Read the script's instructions carefully to enable monitoring on the desired printers.
Set up printers manually
-
Open your printers.conf in a text editor such as vim. On most Linux distributions printers.conf is located at /etc/cups/printers.conf.
-
Prepend papercut: to the DeviceURI of the printers you want to track. After the modification a DeviceURI line might look like:
DeviceURI papercut:ipp://1.2.3.4/printers/My_Printer
-
Restart CUPS in the way appropriate to your distribution. E.g.:
/etc/init.d/cupsys restart
-
Perform a test print on each printer. This causes the printers to be registered. This step is not required with the configure-cups script, because the script registers the printers automatically.
-
The printers should now be registered. Log in to PaperCut NG/MF as admin and verify that the printers are now listed on the Printer List page. Verify that the test prints sent previously were tracked correctly.
Delete a printer
You cannot use the automatic addition of printers functionality if one or more printers in your network are not tracked.
-
Stop new printers from being automatically added to PaperCut NG/MF:
-
On the computer system hosting the queue to be added/removed/ignored, In a text editor such as Notepad, open the file:
[app_dir]\providers\print\mac\print-provider.conf . -
Locate the line EnablePrinterAutoImport=on.
-
Change on to off.
-
Save the file.
-
Restart the secondary server.
The service is called papercut-event-monitor on both Mac and Linux machines. For more information, see How to Enable Debug in the Print Provider.
-
-
On the print server, open a Linux Shell Command Terminal.
-
Navigate to:
cd [app_directory]/providers/print/linux-*
-
Type the following command:
sudo ./configure-cups --list
A list of all printers connected to the server is displayed.
-
To delete a printer, type the following command:
sudo ./configure-cups --remove <printer name>
The printer is now removed from the server.
-
In the Admin interface, delete the printer from PaperCut NG/MF:
-
Click the Printers tab. The Printer List page is displayed.
-
Select a printer. The Printer Details - Summary page is displayed.
-
In the Actions menu, click Delete this printer.
-
-
Test the changes by printing to the deleted printer and ensuring the printer does not re-register itself in the system. It if does, verify that it is not being monitored using configure-cups.
View all the other command line options available
-
Open a Linux Shell Command Terminal.
-
Navigate to:
cd [app_directory]/providers/print/linux-*
-
Run the following command:
./configure-cups --help
-
All the other command line options available are listed.